Goldpriceph.com – Getting a passport is a crucial step for those looking to travel, study, or work abroad, and the DFA Passport Appointment system is here to streamline that process. Navigating the complexities of scheduling a passport appointment can be a daunting task, especially with the growing demand and limited slots available. Understanding the steps involved in securing a DFA appointment is essential to ensure a smooth and stress-free application process.
In this guide, we’ll walk you through the entire process of obtaining a Philippine passport via the DFA Passport Appointment system. From booking your appointment online to preparing the necessary documents, we’ll cover everything you need to know. Whether you’re a first-time applicant or renewing your passport, this comprehensive guide will help you navigate the system with confidence and ease.
A Philippine passport serves as your gateway to international opportunities, whether you’re planning to study, work, or travel abroad. It is not only a crucial travel document but also a significant identification card used for various transactions with government and private entities.
Navigating the process of obtaining or renewing a Philippine passport through the Department of Foreign Affairs (DFA) can be challenging due to the high demand and limited appointment slots. However, with the right guidance, you can streamline this process and reduce the stress involved. This comprehensive guide will walk you through the steps for securing a DFA passport appointment and successfully completing your application or renewal.
How to Secure a Philippine Passport through the DFA Online System
Obtaining a Philippine passport is an essential step for international travel, and the DFA’s online system provides a convenient way to manage this process. To secure your passport, you first need to schedule an appointment through the DFA’s online system. This involves accessing the DFA website, selecting your desired consular office, and choosing a suitable date and time for your appointment. It’s important to complete this step as early as possible, given the high demand and limited slots available.
Once you’ve booked your appointment, you must prepare and submit the required documents. These typically include a valid ID, a birth certificate, and any additional supporting documents if applicable. After submitting your application, you’ll receive instructions for payment and further steps. Following these instructions carefully will ensure your application is processed smoothly. Be sure to attend your appointment on time, dressed appropriately, and with all necessary paperwork to finalize your passport application efficiently.
Step 1: Book Your DFA Passport Appointment Online
To apply for or renew a Philippine passport, you must first schedule an appointment through the DFA’s online system. Here’s a step-by-step guide:
- Access the Appointment System: Visit the DFA website at www.dfa.gov.ph or go directly to the passport appointment
- system at passport.gov.ph/appointment.
- Start Your Appointment Process: Choose whether you’re making an appointment for an individual or a group.
- Select a DFA Office: Pick the consular office where you wish to complete your passport application or renewal.
- Choose Date and Time: Select a convenient date and time for your appointment.
- Complete the Online Form: Fill out the necessary details in the online passport application form.
- Select Processing Type: Decide between regular or expedited passport processing.
After submitting the online form, you’ll receive an email containing a reference number for your passport processing fee payment.
Exemptions for Appointment Booking
Certain individuals are exempt from needing a DFA appointment and can proceed directly to the courtesy lane at DFA Manila ASEANA or other designated locations. These include:
- Children aged seven and under with their parents or guardians
- Pregnant women (with a medical certificate if not visibly pregnant)
- Senior citizens with a valid senior citizen ID and one immediate family member
- Solo parents with a solo parent ID and their minor children
- Persons with disabilities with a PWD ID and one immediate family member
- Overseas Filipino Workers (OFWs) with relevant documentation
For exceptional cases, the Courtesy Lane Privileges may be granted upon approval by high-ranking government officials.
Step 2: Pay the Passport Processing Fee
Payment for the passport processing fee can be made through the DFA ePayment Portal. Authorized payment partners include various payment centers, malls, convenience stores, banks, remittance centers, pawnshops, and online payment channels.
Ensure you pay the exact amount and keep track of your reference number. This reference number is required for processing and cannot be used more than once.
Step 3: Prepare Required Documents
Gather the following documents before your appointment:
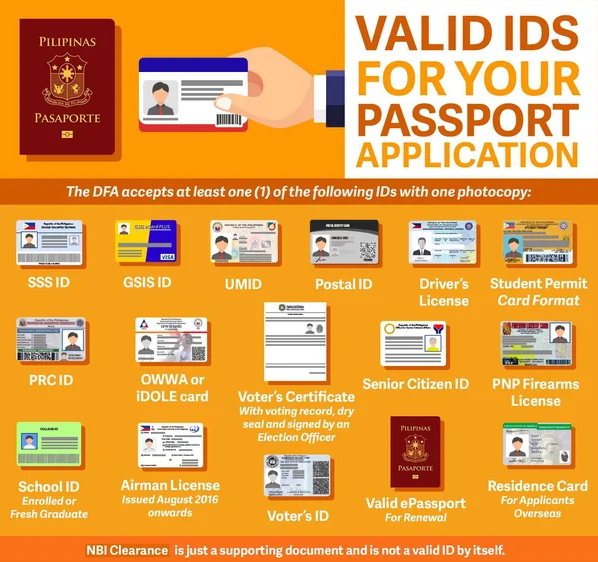
- Valid ID: Include a valid identification card, such as a Philippine passport, SSS ID, or any other acceptable ID. For minors, a school ID or certificate of enrollment is necessary.
- Birth Certificate: Provide an authenticated copy of your birth certificate from the Philippine Statistics Authority (PSA) or a Certified True Copy from the Local Civil Registrar.
- Supporting Documents: Additional documents may be required for naturalized citizens, those with dual citizenship, or married women changing their surname.
Ensure you have both original documents and photocopies.
Step 4: Attend Your DFA Appointment
Arrive at the DFA office 30 minutes before your scheduled time. Dress appropriately and adhere to the dress code. Do not wear earrings or contact lenses during the appointment. Only the applicant may enter the DFA premises unless they are a senior citizen or PWD with an escort.
Step 5: Claim Your Passport or Opt for Delivery
After processing, you can either collect your passport from the DFA office or have it delivered to your address. If collecting in person, present your receipt. If opting for delivery, ensure someone is available to receive the package.
Frequently Asked Questions
- No Available Slots: Refresh the appointment page periodically as slots can open up. Appointments are released Mondays to Fridays at noon and 9:00 p.m.
- Walk-In Appointments: Currently, walk-ins are not allowed except for emergency cases at specific locations.
- Urgent Travel: For emergencies, contact the DFA or your nearest consular office with proof of urgency.
Consular Office Locations: Find your nearest DFA office by checking the DFA’s Consular Office Directory. - Appointment Changes: Use the DFA passport system to reschedule or cancel appointments. Note that fees are non-refundable.
- Travel Agency Appointments: You must book your own appointment; travel agencies cannot secure slots for clients.
- Appointment via Social Media: Only book through the DFA’s official website. Appointments through other channels are not valid.
- Renewing a Passport: For renewals, bring your old passport and a photocopy of its data page. No need for additional IDs or documents.
For further inquiries or to check the status of your application, contact the DFA helpdesk or the consular office where you applied. Remember to secure your travel insurance before your journey!
By following these steps and preparing adequately, you can simplify the passport application process and enjoy a smoother experience.
Conclusion
Securing a DFA passport appointment online may seem like a complex process, but with the right knowledge and preparation, it can be manageable and straightforward. By following the outlined steps-from scheduling your appointment to preparing and submitting the necessary documents-you can ensure that your passport application or renewal proceeds smoothly. Keeping track of your appointment details and adhering to the DFA’s guidelines will help you avoid common pitfalls and reduce the stress often associated with obtaining a passport.
Remember, the key to a successful passport application lies in thorough preparation and timely action. Regularly check the DFA’s online system for available slots, ensure all your documents are in order, and complete your payments promptly to secure your appointment. With these strategies, you’ll be well on your way to obtaining your Philippine passport and opening doors to new opportunities abroad.
